Google Web Designer is great in CSS 3D. Well, at least with boxes. Curved and rounded corners has always been a fiddling, not mentioning a 3D sphere, like a globe, planet or soccer ball.
It took me quite some time, but finally I found a solution, which should do the job.
The secret here is called „Sinusoidal Gores“. Weird name, but this is so far – in my opinion – the best approach to create 3D Spheres either in basic HTML5 CSS or directly in Google Web Designer. Nice name, but how does it look like?
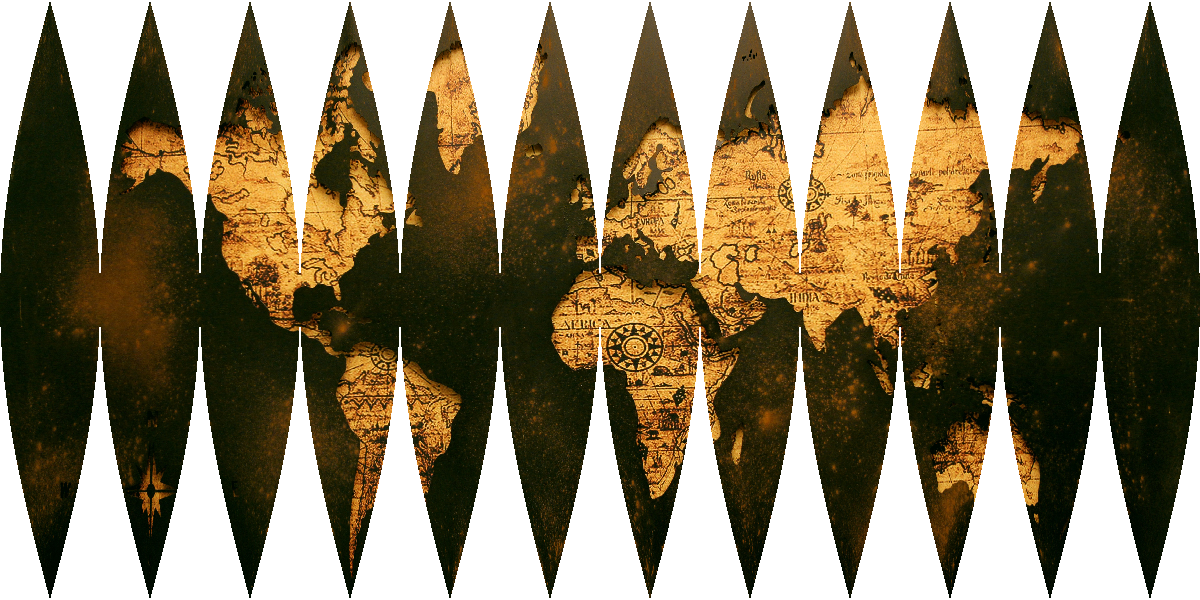
Sinusoidal Gores is what you get, when you (very, very) properly peel an orange.
And this kind of a map projection is not so easy to get. For Photoshop users, there is the Flexify2-Plugin by Flaming Pear, but it costs ~50€. Luckily the NASA is our friend and has created a free tool called G.Projector (you might need a Java update to run this program).
For this tutorial, I’ve downloaded this awesome map from pexels.com, created by Aaditya Arora and imported it to G.Projector through „File“ > „New with import…“, select your downloaded map texture and choose „Equiretangular“ (works with the most map projections, otherwise just do some experiments with the projection) ans „Input projection“.
Your projection view might look like that:
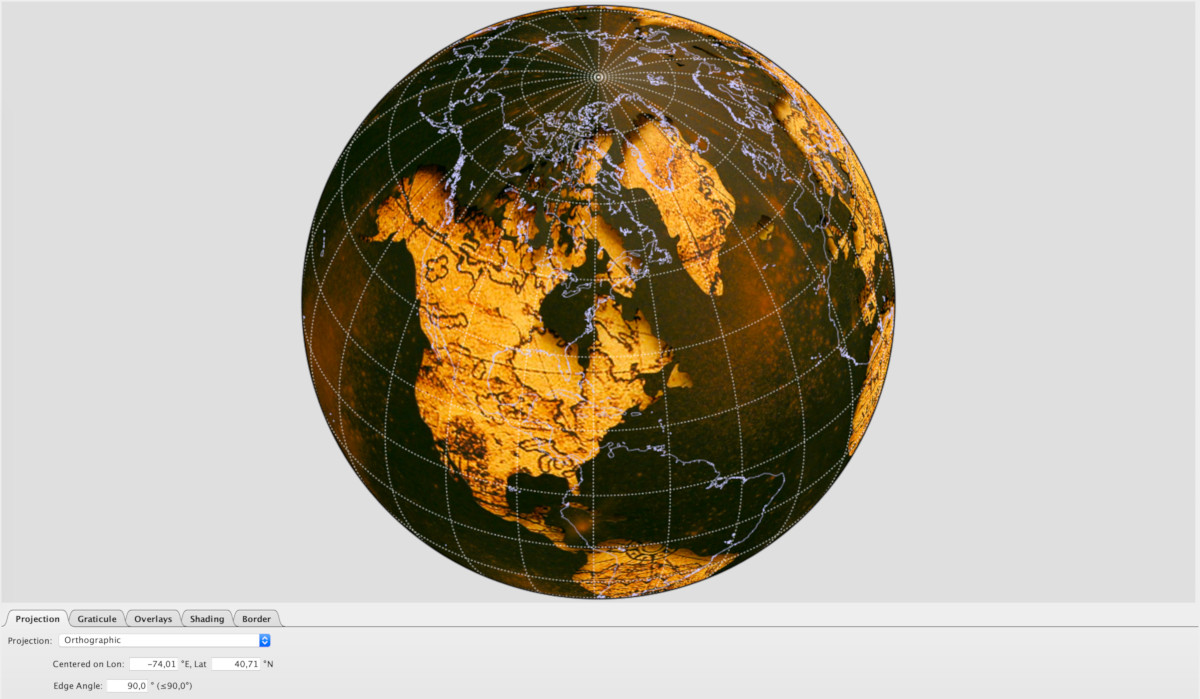
In the „Projection“ tab below at the dropdown, select „Sinusoidal“ as projection mode and „Interrupted: 30° Gores“ as format.
In the „Graticule“ tab, select „None“ for „Stroke“.
In the „Overlays“ tab, select „<none>“ for „Overlay 1“.
In the „Border“ tab, set „Weight“ to 0%.
Export the current view now under „File“ > „Save Map as…“ with the size of 1200 x 600 pxls, unselect the small margin to above.
Done.
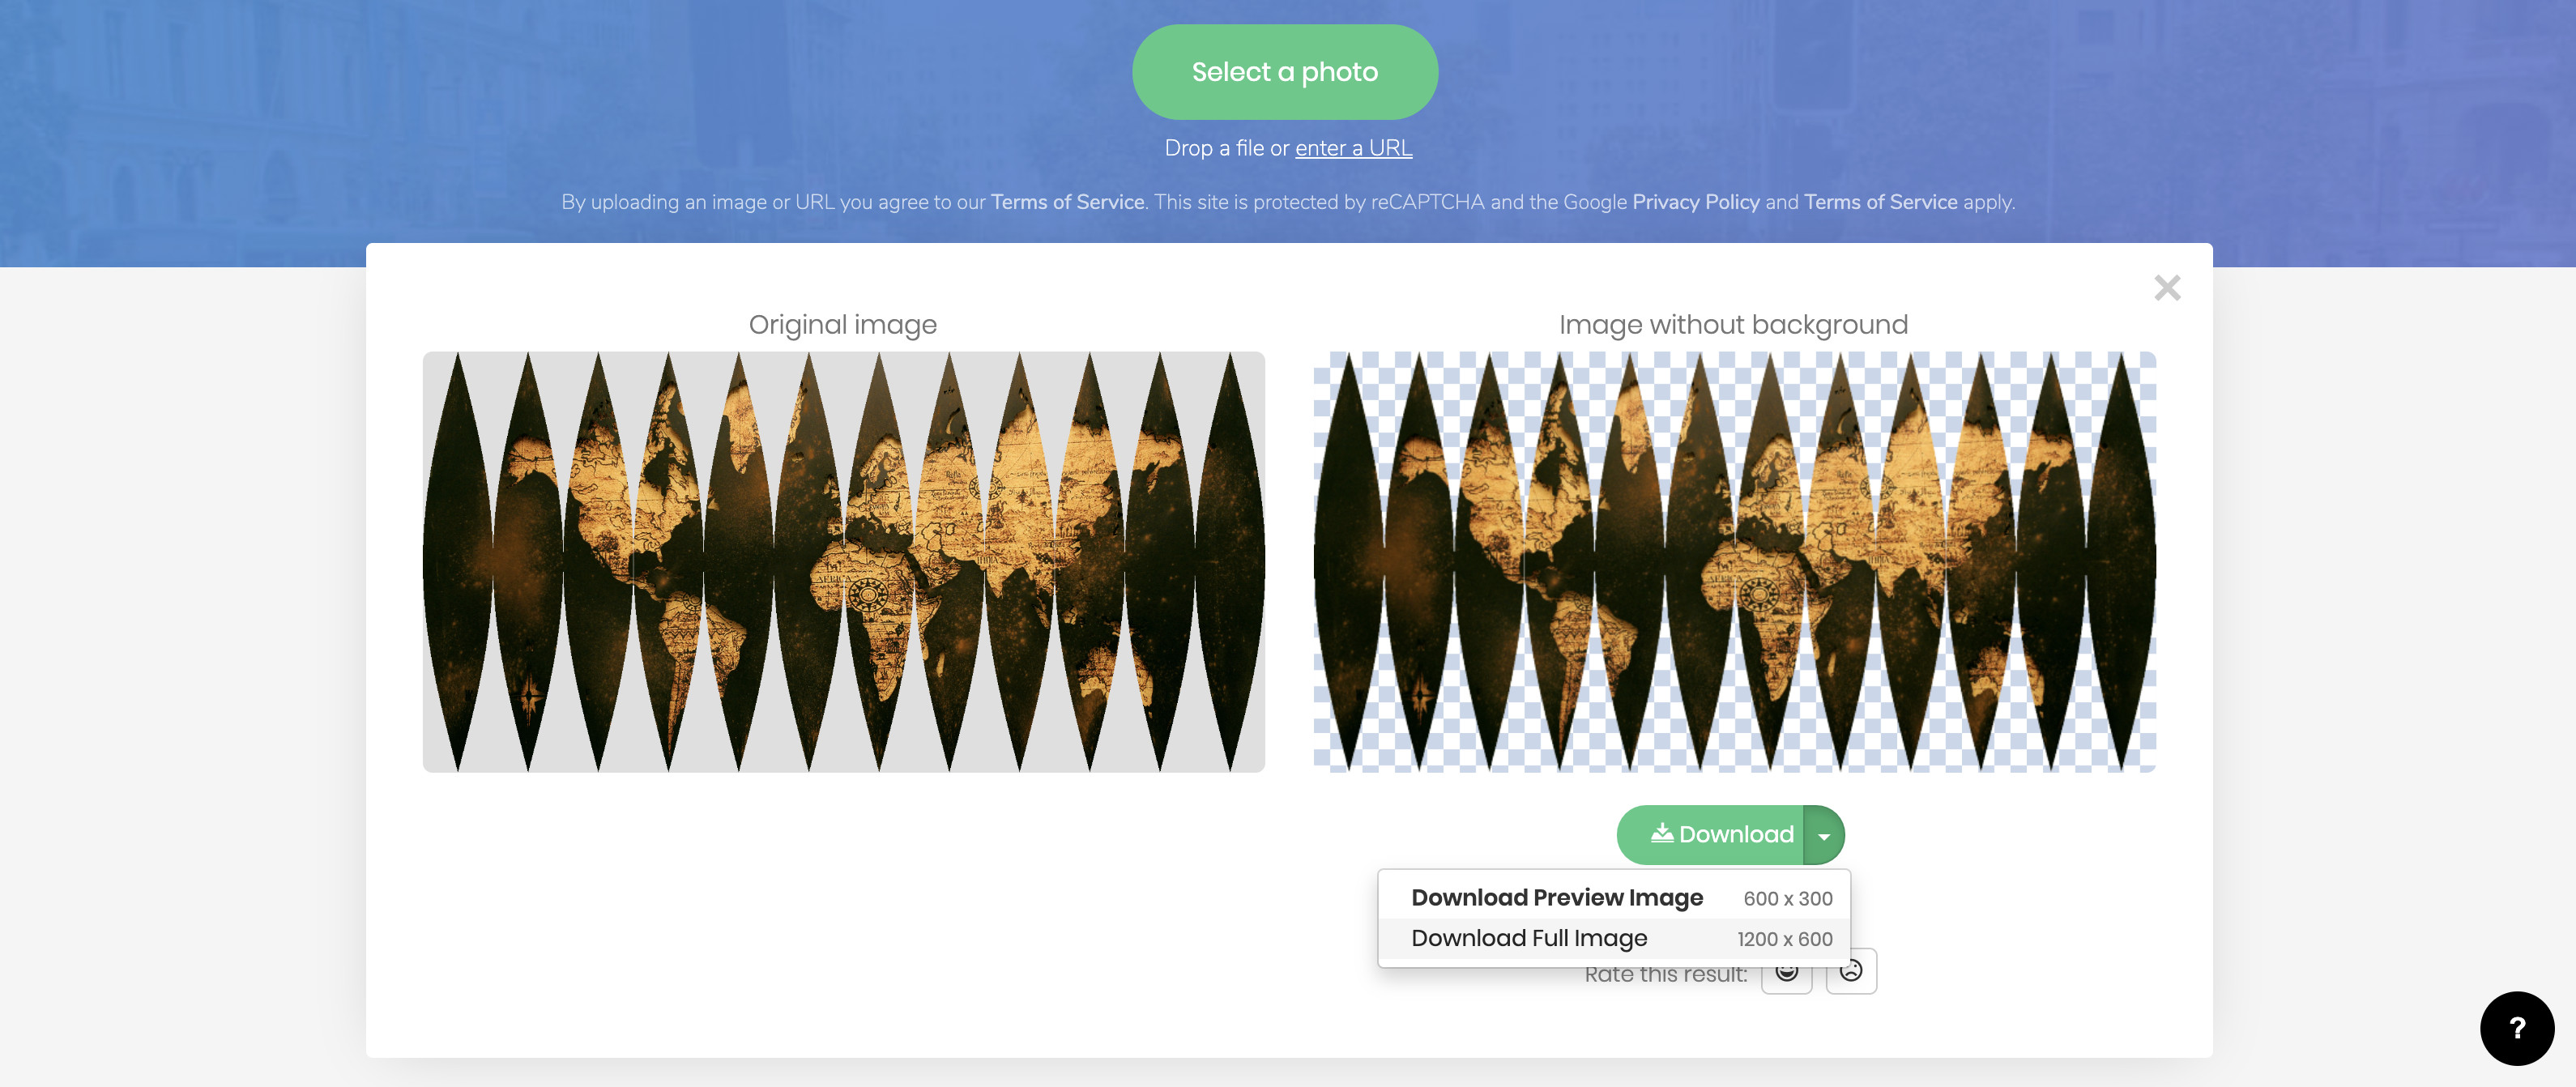
Now, we need to remove the background of the new generated sinusoidal map. You can do this either in GIMP, Photoshop or whatever you prefer. If you are not used to image manipulation, I recommend www.remove.bg. Just upload the image and let the website remove the background.
Download it in full size (1200 x 600 pixels).
Now, it’s time to move to Google Web Designer finally (HTML5 code is according to the GWD workflow).
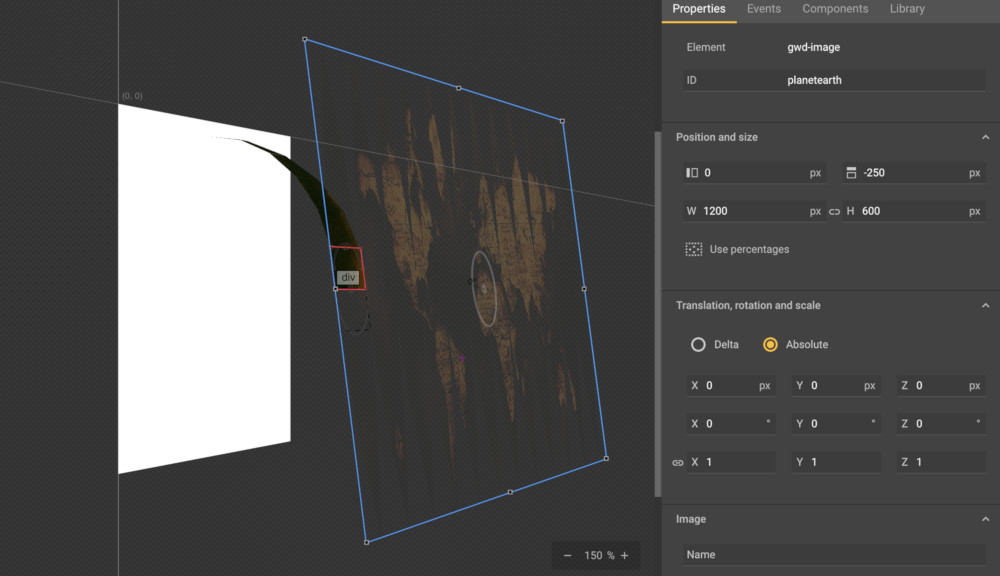
Here we create a stage 300 x 250 pixels. With the „Element tool“ on the left, we add an empty wrapper (HTML5: div) called „earth“ with top: 50%, left: 50%, width: 400px, height: 400px and translate it to x: -200px and y: -200px (scale: 0.6).
By doubleclicking into „earth“, we enter the wrapper and add another element „segment“ with top: 50%, left: 50%, width: 100px, height: 50px, translate x: -50px, y: -25px and z: 184px. This will be one of 12 segments, where each will contain one complete gore.
Within this element „segment“, we add another element with the same size, but at position top:-25px and left:0px. We move the origin to the bottom (CSS: transform-origin: 50% 100%;) and rotate it 7.5° around the x-axis.
Within this element, we’ll add another element, exactly the same size at top:0px and left: 0px, but „overflow: hidden“. Within this container, we’ll drop our sinusoidal map, that we’ve created before and put it on position top: -250px and left: 0px.
Then we go back 2 levels (on „segment“ level) and copy the div element, which contains the element with the image, doubleclick on the element, until its borders are red and paste the clipboard into the container. When we move the copied container to top: 0px, we already have to segments out of 12 for each of the 12 gores.
The Texture is still the same, so we have to move the sinusoidal gores image to top: -200px and rotate x: 15° (and continue doing the last steps 4 times, until the texture shows the top of the gore.
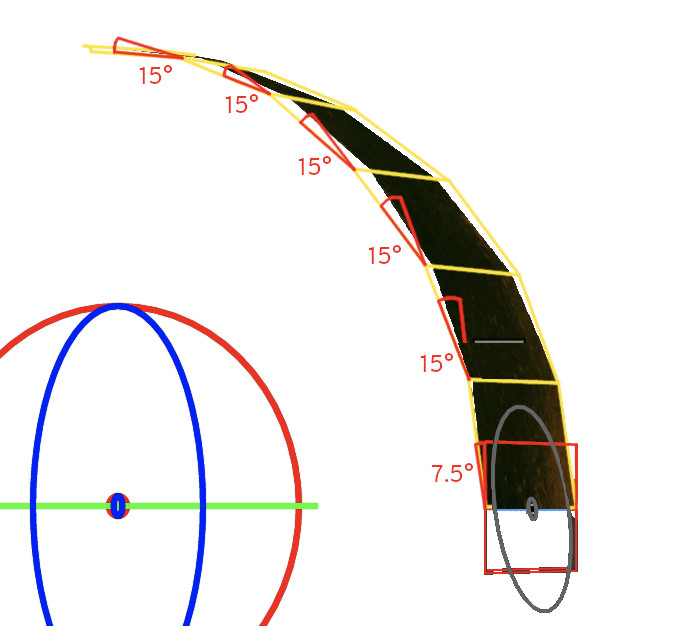
Then we go back to „segment“ level and do exactly the same to the bottom, but with negative values.
When done, we add a new „segment_1“ element within the previous element, move the origin to the left and put the position left to 100px. After we’ve rotated it by 30 degrees around the y axis, we just copy the content of the original „segment“ element and put in into the new „segment_1“ element.
What we are doing here is creating the mesh for the texture, step by step. This sounds easy, but it might be a lot of work, because you have to move the sinusoidal map texture for each element within each segment, in total 144 times.
That’s why I recommend just copying the segment 12 times into the child segment and then do the changes directly in the code view.
Or you just download my GWD project template and replace the „texture.png“ map with your own.